
The Freestanding Handstand Push-Up
Performing handstand push-ups (HSPUs) without the support of a wall or spotter dramatically increases the demands of the movement. The stabilization required during the movement provides a stimulus that is simply not present when the HSPU is assisted. Regularly performing freestanding HSPUs will dramatically improve any overhead lifting or throwing activities. The following article provides a progression for developing the ability to do a freestanding HSPU, starting with no handstand experience whatsoever. This process may take years for many people.
Beginning handstands
Many people will be intimidated simply by the concept of doing a handstand. Fears of falling and/or not being able to support themselves with their arms will be the primary hindrances early on. Proper positioning and a gradual progression will take trainees through this process safely and quickly.
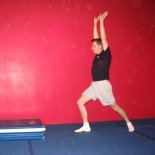
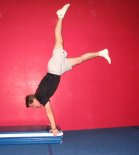
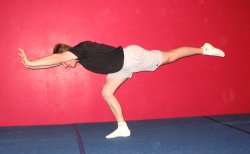
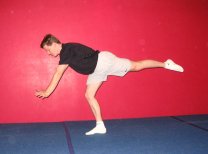
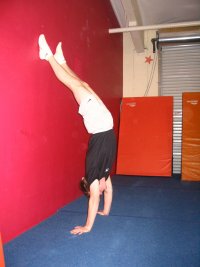
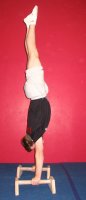
The first step to a handstand is simply to learn how to be comfortable in a hand support. A vertical handstand is not necessary to start this process. Start with a folded panel mat, plyo box, or other stable raised surface. Stand in a shallow lunge in front of the object with arms overhead. In the lunge, the rear leg is the kicking leg, and the front leg is the support leg. Place your hands on the object, and kick your rear leg up toward the ceiling so that the support leg comes off the ground only a few inches. Start small. Getting up into a handstand at this point is not necessary and not recommended.
This initial stage can tell you a lot about the handstand and you can begin to improve handstand technique. The first thing to look for is proper shoulder angle. Many people will push their shoulders forward past their hands. This creates a very unstable position unless the individual performing the handstand is capable of performing a planche. The shoulders should be completely open and active with the arms by the ears. The head should be positioned so that your hands are just visible by looking toward them with your eyes (not moving your whole head). If you can see two feet past your fingertips then your head is too far out and your shoulder angle likely is "broken." Once the proper position has been established, work on kicking higher. If the handstand is approaching 45 degrees from vertical it is time to move off of the raised surface.
Before moving to a handstand on the ground, you should be very comfortable with forward rolls. A forward roll is the easiest and safest way to exit a handstand that falls forward. Training a forward roll is discussed in detail in CrossFit Journal issue 38.
Proper shoulder angle.
Improper shoulder angle.
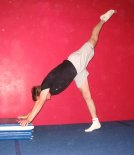
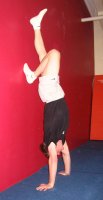
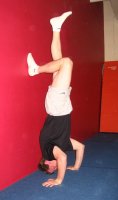
Practicing a handstand on the ground may be the starting point for individuals who already have a solid base level of strength and kinesthetic awareness. The starting point is the same as it was for the raised object. Start in a shallow lunge with arms overhead. Kick to a handstand by lunging forward and kicking your rear leg up toward the ceiling. The kick is what brings the hands to the floor, not reaching down with the hands. A very common mistake is to reach down with the hands, which breaks the shoulder angle and creates a less stable position. The line from wrists to the rear leg should be kept straight. When starting to kick to handstand, the kick should be kept low. As with the handstand drill on a box, only a small kick is necessary to identify deficiencies in the position. Once proper positions have been demonstrated, the kick can be taken higher. Simply kicking up and stepping back down repeatedly will begin to bring the hips higher in each kick and train an understanding of the shoulder and arm push required to hold a handstand. Once the kick leg is reaching vertical, the support leg can be brought up to meet it in the handstand.
Proper and improper shoulder angles.
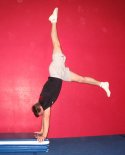
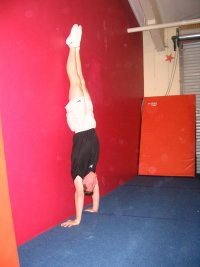
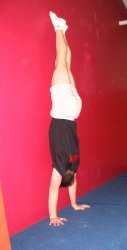
Holding a handstand and improving alignment Once a kick to handstand is consistent, shift focus to holding the handstand. The only way to improve your ability to hold a handstand is to practice handstands. Do handstands whenever you get a chance. This is comparable to learning to walk. When children learn to walk they practice constantly. This is the same approach that should be taken with handstands. A solid static handstand is essential to performing free standing handstand push ups. Handstands can be practiced against a wall to develop strength in the position and to allow for enough time in the handstand to play with body alignment. Handstands against a wall should be practiced both with the back to the wall and facing the wall.
Handstands facing away from the wall do not encourage a proper hollow handstand posture, but allow for practicing balance in a handstand. Start in a lunge facing the wall and kick to handstand so that your heels hit the wall. Be sure to place your fingertips only a couple of inches away from the wall. Start the lunge far enough away from the wall so that you have to stretch forward a bit as you kick to the handstand. This will force a better alignment in the shoulders and improve the mechanics of the kick. This also creates proper positions for other kicking skills such as front handsprings and round offs. Once in the handstand, the shoulders should be pushed up (toward the ears) as far as possible and fully extended. There should be no angle between the shoulders and torso. The line between wrists and toes should be as straight as possible. Once the handstand is aligned properly, push with your fingertips and try to pull your heels away from the wall slightly to hold the handstand. As you get more stable you can walk your hands farther away from the wall to practice your balance.
 |  |
| Correct | Incorrect - hands too far from wall |
Practicing handstands facing the wall helps to ensure a proper hollow handstand position but does not allow for balance practice as readily as facing away from the wall does. To get into a handstand facing the wall start with your back to the wall, bend down and place your hands on the floor 1 to 2 feet away from the wall, then walk your feet up the wall as you walk your hands in to the wall. Try to get your hands as close as possible to the wall. Your toes should be pointed and the tops of your feet should be the only thing touching the wall. It is possible to do this with your wrists virtually touching the wall assuming handstand alignment is good. Proper alignment is an open hollow with shoulders fully extended and pushed up. Think about pushing your toes as high toward the ceiling as possible. Once this position is obtained, try to push away from the wall slightly and transfer your weight to your fingertips and hold the handstand.
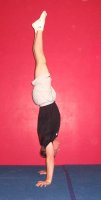
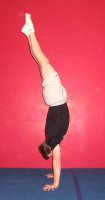
Practice freestanding handstands as often as possible. Kick up to a handstand whenever you get a chance. When you kick to handstand, think about extending your lunge, keeping your shoulders open, and maintaining a straight line between your kick heel and your hands. Part of your practice should be just trying to stay on your hands no matter what it takes. Walk, break form and bend your arms, just stay in the handstand. As you spend time in the handstand you will begin to feel the adjustments that are necessary to maintain it.
In addition to practicing handstands allowing for walking, you should also make a concerted effort to practice static handstands. Kick into a handstand with a tight, straight body and don't move. If you have to take a step, come down and try again. As with previous handstands, kick into the handstand with an extended body and shoulders. Once in the handstand squeeze your legs together, extend your shoulders so that they are completely open, and hold the body in a straight, slightly hollow position. Think about digging your fingertips into the floor while practicing static handstands. This will create a more solid base for the handstand. Think about leaning the handstand slightly forward, as it is easier to save a handstand that is falling forward (over onto your back) than it is to save a handstand falling backward. (The exception to this is on rings.) To save a handstand that is falling forward, extend through your shoulders and dig your fingers into the floor as hard as you can. To save a handstand falling backward pike your shoulders and hips and if necessary bend your arms. As the handstand gets stronger, a slight planche will save a handstand that is falling backward.
 |  |
| Correct | Incorrect |
Assisted handstand push-ups
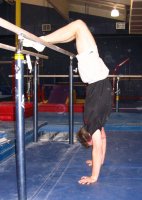
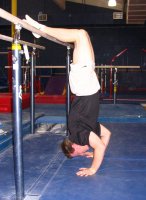
There are several methods of performing assisted HSPUs. Each has benefits, and the various methods should all be used in the progress toward a freestanding HSPU. Doing HSPUs against a wall allows the balance factor to be removed from the exercise so you can begin to strengthen the movement. As with static handstands, these can be done facing the wall or facing away from it. A spot can provide as much balance and lift assistance as necessary. HSPUs can be performed on the ground or on parallettes. Parallettes allow for greater range of motion and help to stabilize the handstand. They can also relieve wrist strain for those with inflexible or injured wrists.
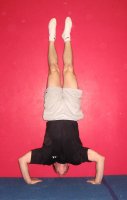
Proper technique during the assisted HSPU will allow faster progress. Throughout the HSPU the body should be kept hollow and as rigid as possible. It is much easier to push a stick than a rope: make your body like a stick. The elbows should be kept in close to the body throughout the motion, not flared out to the sides. In the bottom of the HSPU your hands should be about six to twelve inches in front of your shoulders and your elbows should be directly above your hands. Upright, this would be like holding two dumbbells just in front of your shoulders with your elbows directly beneath your hands. Do not allow your elbows to jut out to the sides or your stability will be severely compromised. When doing HSPUs with your back to the wall, start by just kicking up and working through the movement with your hands close to the wall. As you get stronger move your hands farther away from the wall to allow you to lean your shoulders forward toward the wall as you descend on the HSPU. This forward movement of the shoulders is essential to developing the control required for freestanding HSPUs. In addition to the shoulder lean, bend one or both legs to allow your knees to move away from the wall as well, so you can maintain a straight body from the knees to the hands.
  |  |
| Correct | Incorrect - Elbows out |
Practicing HSPUs facing the wall allows for a hollow position and proper shoulder mechanics without compromising positions in the legs. Hands should be placed a few inches away from the wall to allow for the lean that is necessary in a freestanding HSPU. As the HSPU descends the shoulders should track forward of the hands. The torso should be kept hollow throughout the motion. Resist the urge to arch as you push back to the handstand.
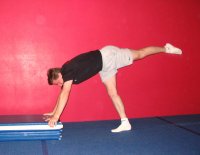
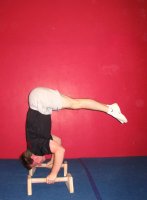
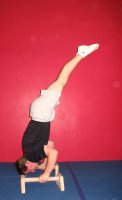
The self-spotted HSPU was introduced to me by the CrossFit community and is an excellent option for practicing HSPU. Using a bar or stacked mats that are just under shoulder height, kick up to the handstand so that your heels can hook the support. You can then use your legs to help balance and lift the HSPU, which makes this exercise a glute and hamstring exercise in addition to training the HSPU.
A practiced spotter can give enough assistance to allow someone who can just barely hold a handstand to perform an HSPU. This same spotter can also provide minimal, balanceonly assistance to someone who is almost capable of a freestanding HSPU. The spotter should stand in front of the spottee and catch his heels as he kicks up to the handstand. From this point on, the spotter should provide the least assistance possible. To provide balanceonly assistance, the spotter can keep her hands completely open, with her thumbs on the spottee's calves and fingers on the spottee's shins. This way no vertical assistance will be provided. On the other end of the spectrum, if the spottee is highly fatigued, or is just beginning to practice HSPU, the spotter can hug the spottee's legs and perform squats as the spottee performs HSPU.
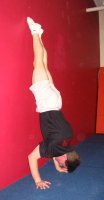
Freestanding handstand push-ups
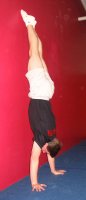
If you are able to perform a 10- to 20-second static handstand with proper position and can do HSPUs with minimal assistance, it is time to start working the HSPU free standing. It will be easier to start on parallettes, as they will provide more stability. Kick into the handstand and push into an extended hollow handstand. Shoulders should be actively extended, shoulder angle should be completely open and body should be hollow. As you descend into the HSPU, allow your shoulders to shift forward of your hands and let your legs counterbalance this motion. Remember to keep your elbows in. At this stage you will find yourself piking to control the balance at times. This is OK. As you progress, you will find that you can pike far enough to touch the floor with your toes at the bottom of the HSPU then press it back to a handstand. As your HSPU gets more stable, aim to eliminate this pike. The effort required to perform one freestanding HSPU is drastically greater than the effort required in one assisted HSPU, and the stabilization it requires provides a demand and stimulus otherwise not present in the movement.
A freestanding HSPU will take a significant amount of work to accomplish, but the benefits gained along the way will be significant as well. All overhead work will be dramatically improved and stabilized. Performing freestanding HSPUs during a workout will increase the time required to complete the workout versus doing HSPUs with assistance, but it will increase the demands and benefit of the workout. As your freestanding HSPU gets more solid, the time discrepancy will be reduced. Practice freestanding handstands and HSPUs frequently. And be patient, as it will take significant practice to perform them with any consistency.
By Roger Harrell.