
Parallette Training - Volume 1
Parallettes are an indispensable piece of training equipment. Fortunately, they are inexpensive, easy to make, light, and portable. With bodyweight exercises alone, incredible strength can be developed simply by selecting positions that will increase muscle loading. The range of exercises they can introduce to a training program is enormous. If you have not already purchased or made a set of parallettes, do so.
Static Holds
Practicing isometric contractions under load has been proven to be very effective in strength development. Some studies have shown dramatic strength increases with nothing but isometric contraction exercises. These static holds can be introduced into your training program in a variety of ways:- Include them in conditioning circuits as fixed holds. E.g., hold an L-sit for 30 seconds.
- Accumulate holds up to a certain total time. E.g., do handstands until you have 60 cumulative seconds of holding time; try to minimize the number of attempts.
- Perform a larger number of shorter holds. E.g., do ten sets of 5-second ball planches.
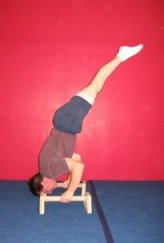
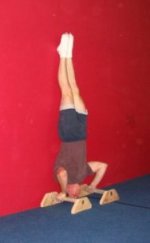
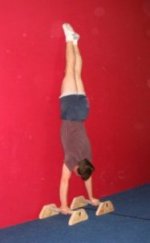
Handstand
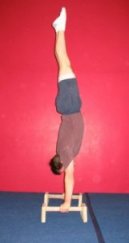
Handstands on parallettes are easier to hold than on the floor as they increase the size of your base, and practicing them on parallettes will help you achieve a stable freestanding handstand sooner.L-sit
Aim for being able to hold an L-sit for at least 30 seconds. This skill helps to develop dramatic abdominal and hip flexor strength. Note that tight hamstrings and/or a tight lower back will make the L-sit significantly more difficult. There are three developmental skills to help train an L-sit: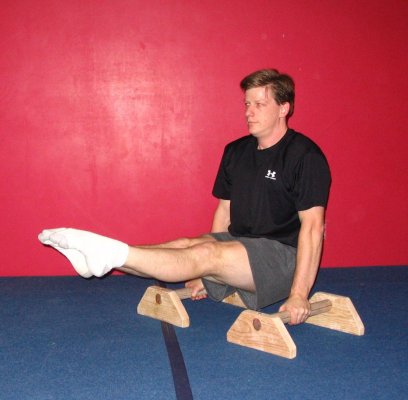
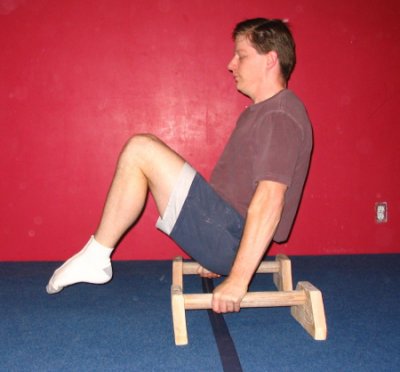
Tucked support:
Hold a support with your thighs pulled in toward your chest and perpendicular to the ground. As you get stronger in this position start working on gradually straightening your legs.
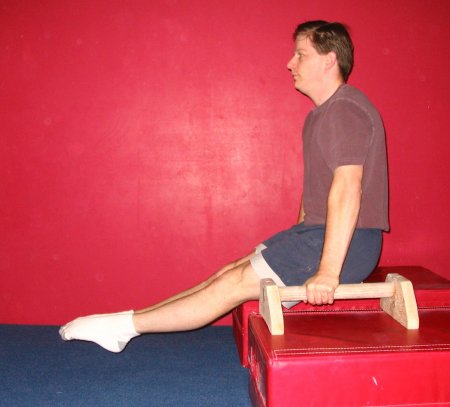
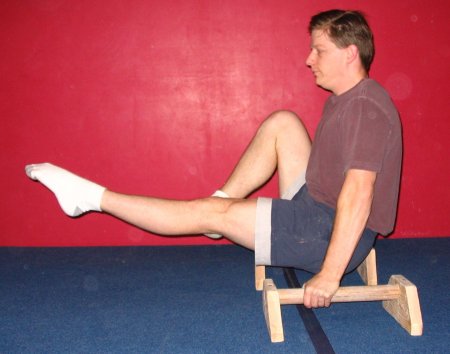
Low L-sit:
If you can find a way to elevate your parallettes (or if you have access to full height parallel bars), you can hold an L-sit with your legs straight but below horizontal. Hold the L for as long as you can (shoot for 10-15 seconds) with your feet as close to horizontal as possible. As you train this you will find yourself able to get closer and closer to a true L-sit.
Single-leg L-sits:
Hold the L-sit with one leg bent and one leg straight. This will teach you the necessary muscle contractions to hold the L-sit while reducing the load sufficiently to allow you to perform the skill. Your bent leg can either be lightly touching the ground or lifted off the floor, depending on your progress in the skill. Be sure to work this evenly with both legs.
Note: Any of the lead-up skills can be used as a fallback whenever your L-sit fails. E.g., if you are attempting a 30 second L-sit and you are about to touch the floor at 15 seconds, either fall back into a tucked L-sit or pull one leg in toward your chest, for the remaining 15 seconds. Stick with it.
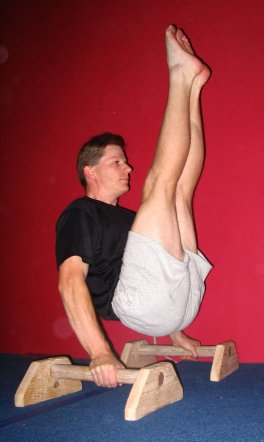
V-Sit:
A V-sit is an L-sit except that your legs are raised to the point where they are 45 degrees or more above horizontal. This skill requires and develops intense compression of the abs and flexibility in the lower back and hamstrings. Moreover, because the skill requires you to lean back and push your hips forward, it is an excellent stimulus for the triceps. To start working toward a V-sit, hold a tucked support with your knees as high as possible, then straighten your legs. Yes, the quad cramping is normal. It will go away in time. Once you are able to go from a tucked support to a V-sit and hold it for a few seconds, you can start working on lifting your legs from an L-sit directly into a V-sit.
Manna:
The next stage in the L-sit family is a manna. This skill takes a V-sit, rolls it back even further until your hips are level with your shoulders and your hips are fully folded so that your legs are straight and parallel with the ground, thighs facing your chest and feet extended beyond your head. This skill requires enormous triceps strength and dynamic shoulder flexibility. Manna holds with a spot is the best way to work up to this skill.
Straddle L:
A straddle L requires and helps to develop hip flexibility and hip flexor strength. If you are unable to sit in a straddle on the floor and lean forward so that your lower back is at most 45 degrees above horizontal, you will have difficulty performing this skill until you have gained that flexibility. To start, place your hands on the parallettes and squat with your feet outside the parallettes so that your inner thighs are contacting your arms just above the elbow. Then push into a support and straighten your legs.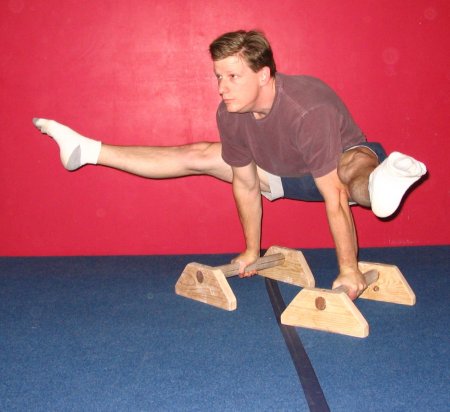
English straddle L on a single parallette:
An English straddle L is one in which a single parallette is perpendicular to your torso. One hand will be in front of the other. Both hand positions should be practiced to balance development. Working English straddle Ls on one parallette requires intense contraction in the hip flexors, as well as requiring stabilization throughout the shoulders and arms.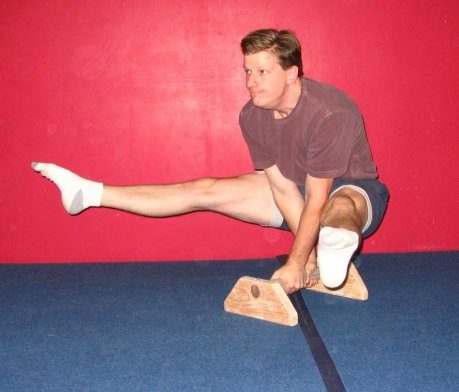
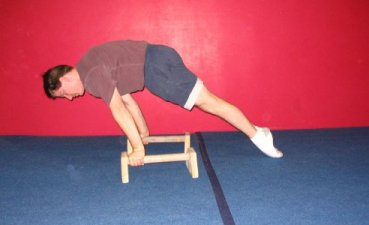
Ball planche:
Squat down next to your parallettes, grip them with straight arms, lean forward, and lift your legs off the ground, keeping them bent at the knees. Be sure to keep your arms straight. Bending your arms completely changes the loading of the skill and will slow your progress. Your goal is to have your back parallel to the floor. Aim to hold the ball planche for at least 10 seconds. As your strength increases you can start to open your hips to increase the difficulty of the ball planche. Eventually you will be able to extend to a straddle planche, then bring your legs together for a true legs-together planche.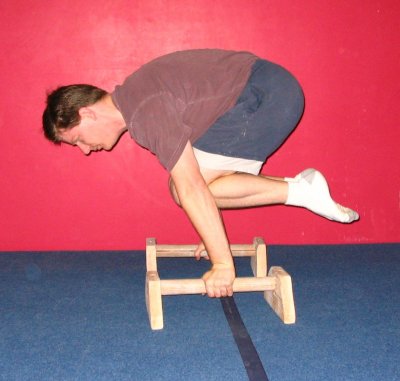
Dynamic Exercises:
Many common exercises, such as push-ups and handstands, for example, can be done on parallettes rather than the floor. Using parallettes reduces wrist strain by requiring a less extreme angle in the wrists. For most exercises, parallettes will also increase the possible range of motion (ROM), which makes the exercise more effective.Push-ups:
Normal everyday push-ups can be done on parallettes. This will allow you to perform a greater ROM by dropping your chest below your hands at the bottom.
Push-ups with elevated feet:
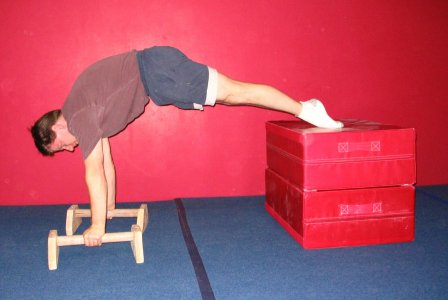
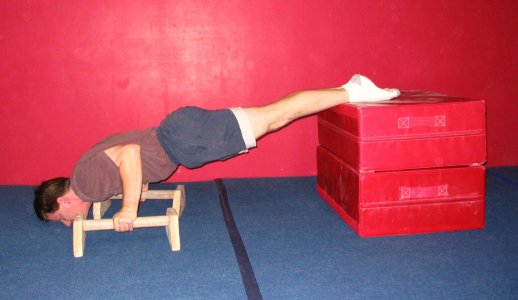
Set up your parallettes so you can put your feet on a raised surface. This will shift more of the weight over your hands, increasing the demands of the push-up. To increase the loads further, lean forward as you do the push-ups. Performing this push-up while leaning forward significantly begins to approach the demands of a planche push-up (see below).
Pseudo-planche push-ups:
Best done wearing socks or shoes. Start in a push-up position on the parallettes but with your feet pointed so the tops of your feet are resting on the floor. Lean forward as far as you are able to maintain control. Lower yourself into the bottom of the push-up, allowing your shoulders to come down well in front of your hands. Push back up. As you gain strength in this exercise you will find that your feet will start to come off the floor. The ultimate example of this exercise is when your feet never touch the floor.

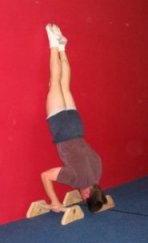
Handstand push-ups:
Handstand push-ups (HSPUs) on parallettes allow for greater ROM and greater stability than HSPUs on the floor. On the floor it is not possible to do a full-range HSPU, as your head gets in the way. On parallettes, your head can pass below your hands, allowing you to reach the bottom of the HSPU, with your shoulders nearly resting on the parallettes. This bottom phase is critical for proper strength development for handstand skills. HSPUs should first be performed with a spot or against a wall. If you do them against a wall, be sure to work them both facing the wall and with your back to the wall.

Ball planche push-ups:
Once your ball planche is stable you can begin to perform ball planche push-ups. Hold a ball planche and, while keeping your torso horizontal, perform a push-up. Be sure to completely straighten your arms at the top. Doing ball planche push-ups without fully straightening your arms only reinforces the bad habit of holding a bent-arm ball planche.
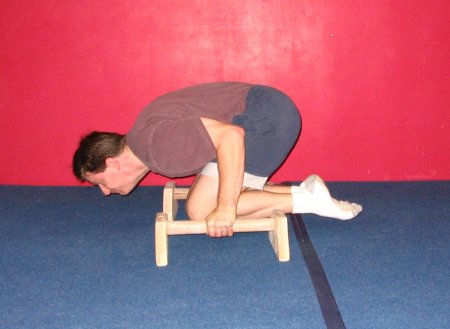
Planche push-ups:
The natural extension of the ball planche push-up is the planche push-up. While few will accomplish this, it is a goal worth shooting for.
Planche push-up to shoulder extension:
Set up as if you were going to do raised-feet push-ups with a significant forward lean on the push-up. Start in a prone support with your feet on a raised surface and perform a push-up, but at the top of the motion pike, lifting your butt as high as you can, and press your shoulders open. This will develop strength for both a planche and a press to handstand.
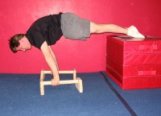
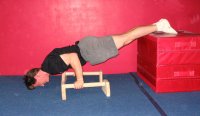
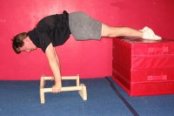
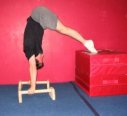
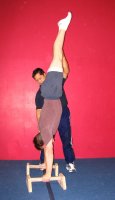
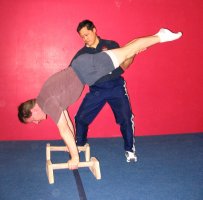
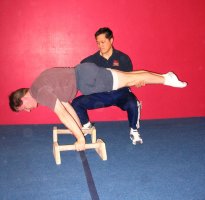
Planche press handstand:
Learning this drill requires a spotter. My discussion assumes the spotter is standing on the gymnast’s left side. The gymnast will kick up to a handstand on the parallettes. The spotter will place their left hand on the gymnast’s left shoulder and right hand on the gymnast’s left leg in the lower quad area. The gymnast will then lower into a legs-together planche and press back to a handstand. The spotter should do all they can to minimize the spotting requirement. This will involve judging the balance point and generally pushing the gymnast a bit forward. The spotter’s left hand will prevent the gymnast from falling forward, and the spotter’s right hand will support as much of the gymnast’s weight as needed. The spotter should stand in close to ensure the most advantageous position. It is the spotter’s duty to ensure two things: first, that the gymnast is stable and safe, and, second, that the gymnast is doing as much of the work as possible.
See here for construction instructions.
By Roger Harrell.
Related Events:
Parallel Bars
Related Skills:
Kip to L
Handstand
Handstand (2s.)
V-sit